|
|
Posted By Matt Wank #217542,
Tuesday, October 13, 2020
|
I am the proud owner of two motorcycles, a Yamaha YZF-R6 and a BMW F 650 GS. The first I use for sport riding, the second for adventure touring. I recently considered adding a third bike to my collection, something more appropriate for the new lockdown-influenced and limited short zips around town. A new BMW 310 costs under $6,000, as does a Royal Enfield Continental GT 650, and all sport ABS and other expected modern motorcycle technology.
Thinking about $6,000 for a beautiful, fun, brand new bike from historically significant brands got me to thinking about the opportunity cost for me to buy a third bike, when technically either of the two I currently have will accomplish the same fundamental operation. A two-week vacation to Croatia, including one week sailing on a boat, would cost at least $4,000. A trip to Africa to summit Mt. Kilimanjaro and experience a safari would easily cost $6,000 plus airfare. I could just put the money into savings for a down payment on a home, or increase my 401k contribution Both non-motorcycling adventures and responsibilities pile up quickly as legitimate opportunities for using the money elsewhere.

Matt's F 650 GS in front of a covered bridge in Maryland.
Obviously I’m not here writing about buying another motorcycle. Their up-front costs are a tangible example to help put what this article is about—the opportunity costs of accessorizing—into perspective. In the few years I’ve been a BMW owner and MOA member, I’ve learned how under-accessorized I’ve been all this time, and how many solutions there are to solve problems I didn’t know I had. Without them it is a miracle I’m even able to get out of second gear! It can be overwhelming, and the paraphernalia push can convince anybody they’re not doing it right. Fortunately, I rode in a T-shirt and jeans long enough to know better.
Even if someone like me gets past the weight of perception and expectation—or whether or not a particular look is considered cool—there is another prohibitive factor in accessorizing: Cost. Let’s call out some common items I’ve seen in the last few years. Note these are average costs across known quality brands, and I’m erring on the conservative side because I can do that and still make a point:
- Riding Jacket - $500
- Riding Pants - $300
- Riding Boots - $200
- Improved Lighting - $800
- Panniers/Top Case - $1,200
- Tank Bag - $200
- Windscreen - $200
- Seat - $200
- Communication System - $300
- GPS - $300
Now let’s compare the above to how I’ve approached things since becoming a BMW fan/owner:
- Riding Jacket - T-shirts forever! Just kidding, I splurged on a BILT jacket for improved visibility seven years ago at a CycleGear in Austin, Texas. It offers about as much protection as cardboard. Maybe $100.
- Riding Pants - No joke on jeans here. Sometimes a pair of hiking pants. I don’t own any motorcycle bottoms. $0.
- Riding Boots - Sneakers for the most part, except for long rides, when I wear a pair of hiking boots. $0.
- Improved Lighting - I typically don’t ride at night and I ride mostly on streets, which usually provide lighting. $0.
- Panniers/Top Case - It is pretty hard to adventure tour without additional storage. The BMW I bought came with panniers, but I purchased the matching top case afterwards for $600.
- Tank Bag - I wear a backpack. $0.
- Windscreen - Is that all you got, wind!? $0.
- Seat - My butt hurts. I’m young and on a motorcycle, so who cares!? $0.
- Communication System - I don’t want to talk to anyone, and I make up my own songs. $0.
- GPS - Google is pretty good at this. Phone it is! $0.
- Total: $700 of motorcycle-specific additional cost.
Having saved $3,500 in that process, I’m over halfway towards the cost of another motorcycle, even closer if I buy used! I’ve also saved enough for a pretty awesome vacation to somewhere exotic, or enough money down to afford mortgage payments on that first home.
Note my focus here on how BMW riders prioritize enhanced options to basic necessities. I’m not questioning the comfort, protection or other added value these enhanced options provide. However, if I’m trying to enter the world of BMW Motorrad, or motorcycling in general, this opportunity cost is a barrier to entry that shouldn’t be underestimated.

Veteran Memorial Bridge near York, Pennsylvania.
I imagine some of you are saying, “I thought this was supposed to be a product review, and you just told us how you don’t have any such products.” COVID-19 and the subsequent lockdown has changed everything. I have been able to save money in ways I haven’t before, including thousands of dollars allocated for international vacations. The other opportunities no longer exist. Each month I have been willing to take a piece of that extra money and dabble in the enhanced accessory lifestyle. Not only that, I’ve looked at MOA event options as much cheaper vacations to replace those international trips.
Considering I’ve been strongly resistant to such enhanced gear, I consider myself an unbiased evaluator. In other words, I’m not comparing these items' value to what the manufacturers or our riding comrades state, or trying to justify to myself their expense. Instead, I'm comparing them to a riding reality: You don't actually need any of this stuff to go on a motorcycle adventure. My typical priority of the extensive opportunity cost explained above sacrificed by buying them. To the review!
WINDSCREEN
 Compared to many aftermarket windscreens with strong design edges, secondary windscreens, or spoilers, etc., the Touratech windscreen looks almost more stock than the original. The simplicity and low-frills look provides incredible results. I'm 5'9" for what that's worth, but after just the first ride with this on, I literally said to myself, ”What have I been doing the last ten years?” It turns out the wind does have a lot to give and I've been taking a beating without realizing it. It was such a significant change to my riding experience, I'll never go back. Well done, Touratech! 6 out of 5 stars. Compared to many aftermarket windscreens with strong design edges, secondary windscreens, or spoilers, etc., the Touratech windscreen looks almost more stock than the original. The simplicity and low-frills look provides incredible results. I'm 5'9" for what that's worth, but after just the first ride with this on, I literally said to myself, ”What have I been doing the last ten years?” It turns out the wind does have a lot to give and I've been taking a beating without realizing it. It was such a significant change to my riding experience, I'll never go back. Well done, Touratech! 6 out of 5 stars.
BOOTS
 Between a FortNine video and other research, I was dead set on Klim Outlanders. Advertised as the ultimate hybrid riding and hiking boots, it was right up my alley until one of those intrusive, privacy-be-damned advertisements crammed into a completely unrelated website showed a smaller Klim boot, the Transition. After not clicking it directly so they wouldn’t get the satisfaction of knowing their spam worked, a separate research effort led me to choose the Transition over the Outlander. The Overlander, although absolutely more boot, is better suited to backcountry riding. The Transition boot is better suited for those who ride on pavement up to the trailhead, but that does come at the cost of protection above the ankle. Both of these boots come with a list of technology so long it would make a CVS receipt jealous, and most of it I’m entirely unfamiliar with. Pre-pandemic Me would have said it isn’t worth the price tag, but now Pandemic Me was willing to take the risk and find out. The website displays it best: Between a FortNine video and other research, I was dead set on Klim Outlanders. Advertised as the ultimate hybrid riding and hiking boots, it was right up my alley until one of those intrusive, privacy-be-damned advertisements crammed into a completely unrelated website showed a smaller Klim boot, the Transition. After not clicking it directly so they wouldn’t get the satisfaction of knowing their spam worked, a separate research effort led me to choose the Transition over the Outlander. The Overlander, although absolutely more boot, is better suited to backcountry riding. The Transition boot is better suited for those who ride on pavement up to the trailhead, but that does come at the cost of protection above the ankle. Both of these boots come with a list of technology so long it would make a CVS receipt jealous, and most of it I’m entirely unfamiliar with. Pre-pandemic Me would have said it isn’t worth the price tag, but now Pandemic Me was willing to take the risk and find out. The website displays it best:
“GORE-TEX®, guaranteed to keep you dry®. Micro-adjustable BOA® closure system helps you find the perfect fit. Mid-high boot design for ankle support. NESTFIT® system cradles your feet, accounting for every contour as it follows the natural flow [and] design of the foot. HYPERGRIP® sole provides superior traction [and] durability. ORTHOLITE® insole provides a comfortable [and] customized fit.”
I’ve never seen so many made-up words, and I don’t know what most of them actually translate to as far as feel, but whatever it is, it WORKS®. First of all, that BOA® system is super easy, and it is somehow much more comfortable than laces while remaining just as secure. I am skeptical of how long the plastic parts (which won’t be as simple to replace as laces ) will last under real use, but only time will tell. I’m not going to get into the other trademarked features individually, but I will say these are without a doubt the most comfortable boots, if not shoes in general, I’ve ever put on. While riding, I barely notice I’m wearing footwear, and they also provide more than enough reinforcement to manage controls. I also went on two hikes with them, one scaling a waterfall, and they performed well. I have had better boots from a pure hiking standpoint, but again, from full use and motorcycle perspectives, never better. 6 out of 5 stars.
TANK BAG
 I always thought tank bags are neat, but never thought one necessary when compared to the cost. I've used backpacks extensively and had no issues or ever been in a situation where I thought, "I wish I had a tank bag right now." However, there has been a niche where I felt a tank bag would be nice to have: Photography. I am a very amateur photographer and have done free work for family and friends using an entry-level DSLR with the right lenses and the right time of day/lighting to avoid heavy post-production work. I love it, but I rarely bring the DSLR and lenses with me on motorcycle trips because they are heavy and take up space; modern phone cameras are high quality, other than the zoom. As important as good lenses are to high-quality photography, the opportunity cost of space and weight in existing luggage has not been worth it. I always thought tank bags are neat, but never thought one necessary when compared to the cost. I've used backpacks extensively and had no issues or ever been in a situation where I thought, "I wish I had a tank bag right now." However, there has been a niche where I felt a tank bag would be nice to have: Photography. I am a very amateur photographer and have done free work for family and friends using an entry-level DSLR with the right lenses and the right time of day/lighting to avoid heavy post-production work. I love it, but I rarely bring the DSLR and lenses with me on motorcycle trips because they are heavy and take up space; modern phone cameras are high quality, other than the zoom. As important as good lenses are to high-quality photography, the opportunity cost of space and weight in existing luggage has not been worth it.
The benefit of camera gear in a tank bag is the ease of access. If I see something awesome, I can pull over, unzip the bag right on the tank, pull out the prepped camera, and shoot. No fumbling around with keys, unlocking cases, then finally digging into a bag. No grappling with a backpack and making sure it doesn't fall over or get lost. The tank bag is perfectly positioned, well secured and virtually at my fingertips. After reading websites and watching YouTube videos, I went with the Giant Loop Diablo. It is by no means their largest tank bag, but that's exactly what I wanted. I'm just carrying some camera gear, not doing a round-the-world trip.
I use the Diablo for the camera body and three lenses, a few extra batteries and other small accessories. I’m hoping to squeeze in a fourth large telephoto lens at some point. It is cutting it close on space, but I believe it will be just right. Sometimes having more space can lead to packing more items than necessary simply because space exists; the size of the Diablo will force me to make efficient decisions. Installation of the base was easy, and the bag's removal and attachment are straightforward. The touchscreen-friendly top sleeve does what it is supposed to do, but I find the flat position of my phone for GPS use challenging, so I'll continue to use the RAM mount I've had for ages. 5 out of 5 stars. Not six because as great as it is, it wasn't moto-life changing.
EAR PLUGS
 I then purchased ear plugs, specifically the Pinlock Ear Plug Set, once again the result of a FortNine video and additional research. Certainly not the cheapest option, but they clean easily and should last a long time. The other supposed feature is they claim to quiet only specific decibel ranges to allow things you may want to hear—like people talking—while blocking unwanted noise from the wind and engine. I tested these by not wearing them during the first half of a recent trip, then using them on the way back. I can say with absolute certainty there was some sort of difference in noise level. What precisely that difference was, if it will prevent hearing loss, and how much hearing loss over the next couple of decades, I’m not sure any of us can accurately measure. How will I know when I lose my hearing in 30 years how much worse it would’ve been if I didn’t start wearing ear plugs ten years into my motorcycle career? I won’t, but I do know it is common sense to protect my hearing, so I will continue wearing them on longer rides. 4 out of 5 stars, a four because the foam container they come in isn’t the greatest and will likely break sooner rather than later. Ask me again 30 years from now and if I can hear you the first time, 6 out of 5 stars. I then purchased ear plugs, specifically the Pinlock Ear Plug Set, once again the result of a FortNine video and additional research. Certainly not the cheapest option, but they clean easily and should last a long time. The other supposed feature is they claim to quiet only specific decibel ranges to allow things you may want to hear—like people talking—while blocking unwanted noise from the wind and engine. I tested these by not wearing them during the first half of a recent trip, then using them on the way back. I can say with absolute certainty there was some sort of difference in noise level. What precisely that difference was, if it will prevent hearing loss, and how much hearing loss over the next couple of decades, I’m not sure any of us can accurately measure. How will I know when I lose my hearing in 30 years how much worse it would’ve been if I didn’t start wearing ear plugs ten years into my motorcycle career? I won’t, but I do know it is common sense to protect my hearing, so I will continue wearing them on longer rides. 4 out of 5 stars, a four because the foam container they come in isn’t the greatest and will likely break sooner rather than later. Ask me again 30 years from now and if I can hear you the first time, 6 out of 5 stars.
MOA GETAWAY
The final purchase was the trip where I first tested all of the items above, the MOA Getaway in Poconos, Pennsylvania. I’ve seen the various MOA Getaway events in the back of each month’s BMW Owners News magazine. They seemed interesting, but I never seriously considered attending one. I’m a bit of an introvert in that although I don’t have issues holding conversations with people, I don’t particularly like being expected to do it. If I pay to attend an event with a group of people, for some reason, those people expect you to talk to them. With only so much energy to give towards conversation, I’ll inevitably come off as rude or uninterested. However, just as with the monetary savings from pandemic lockdown, adventure and human interaction savings have added up. I needed to get out, and I needed a long ride.

The Pagoda in Reading, Pennsylvania.
The nice thing about the Getaway is you don’t have to research dates, locations, routes, meals, etc. Not only is planning easier, but in times like these when an event could be canceled last minute, your overall investment is less, and therefore cancellation is less disappointing.
I planned out longer routes to and from the Poconos, stopping at various points of interest, as avoiding highways and making spontaneous decisions along the way was important. Taking seven hours to travel what normally would take closer to four, I stopped briefly at various locations I otherwise would’ve sped by, including some covered bridges in Maryland, a nice view of the Veterans Memorial Bridge near York, Pennsylvania, and The Pagoda above the city of Reading, Pennsylvania. The location chosen by MOA for the Getaway itself, Skytop Lodge, and its surrounding 4,000-acre grounds, is beautiful.

Skytop, the location of the MOA Getaway in Poconos, Pennsylvania.
Any and everything you could want, both inside and outside, especially in the mountains, is available. I can’t speak to the quality of all the outdoor amenities besides the hiking trails, as I spent all my other outdoor time on the motorcycle, but they looked fun for all ages. Skytop is so nice that typical nightly rates would’ve been cost prohibitive to staying there on my own. However, with the discounted rate as an MOA Getaway participant, it was more than reasonable, and I even booked an extra night.
When I arrived a day early, a nice section of the parking lot was already blocked off for motorcycles. The next day after riding around the area all day, I checked in for the Getaway itself and received a welcome bag with goodies inside. That night dinner was provided outside, and the attendees were formally welcomed. With no previous motorcycle rally or convention experience outside of the Progressive International Motorcycle Shows, I imagined there would be rooms of vendors, several series of presentations and even demonstrations. The reality is the opposite, and pleasantly so. MOA Getaways are all about the riding, allowing you to truly get away.

Bike parking only!
Six different routes of varying shapes and sizes were printed out for us to enjoy as a group or solo on Saturday. I chose one that had a tasty local famous hot dog joint, Hot Dog Johnny, as the midway point. The next morning I enjoyed a coffee from Skytop’s full-service coffee shop, then spent the entire day on a lovely ride through Pennsylvania, New Jersey and New York—even all three at once near Port Jervis, New York. The route took the Delaware River Scenic Byway out of Port Jervis, a short but beautiful ride, and as scenic as advertised.
I arrived back at Skytop in the late afternoon, considered another nearby hike before the night’s Getaway dinner and a presentation. Unfortunately, the weather suggested thunderstorms the next morning, and the storm’s path would have me riding in rain my entire way home. No amount of enhanced gear will convince me riding in thunderstorms for five hours next to speeding cars is an acceptable option. Still, it took me 45 minutes to give in and hit the road early. There are more MOA Getaways in my future. 6 out of 5 stars.

Hot Dog Johnny, home of delicious hot dogs.
The four-hour ride home gave me time to contemplate many things besides the new accessories. First of all, I need to get a seat enhancement for my sore rump. If everything else worked, I must be missing out on some fantastic riding where you don’t have to shift your cheek position every five minutes, regularly stand or generally go numb. I also felt Skytop’s staff and guests did a great job managing distance, cleanliness, wearing masks and general consideration for the reality of a pandemic.

The tri-state border near Port Jervis.
I am incredibly fortunate to have the job security and resources to even go to this event and purchase all these new accessories. While my evaluation compares the opportunity cost of one set of luxuries to another, many others are forced to compare life necessities. I think we’d all rather someone pay utility bills for a few years than buy a G 310 GS. For those of us that can afford it, get out there, hit the road, go to events and get the most of the opportunities in front of you!

The Delaware Scenic Byway.
This post has not been tagged.
Permalink
| Comments (1)
|
|
|
Posted By Roger Wiles #32797,
Monday, August 31, 2020
Updated: Monday, August 31, 2020
|
The current capstone of Garmin’s line of moto-friendly GPS navigation units, the zūmo XT, recently debuted. I’ve often heard grumblings about previous zūmo models, including difficulty viewing the screen under certain daylight conditions, and frustration when attempting to use a gloved finger to address the touchscreen. For some, these are minor nits being picked; for others these are dealbreakers. Happily, Garmin has not only addressed these issue, but managed to creatively pack an impressive host of innovative features into the XT.
The XT’s 5.5-inch screen is easily readable, even with sunglasses, in all light conditions I’ve encountered to date, including brightest central Florida summer sun. Even the smallest roads and trails are visible down to the 0.8 miles scale. I find no need for a sunshade. The touchscreen responds reliably and positively to a light but firm touch or tap by a gloved or bare forefinger; any glove appears to work well. Touch accuracy with a glove is acceptable. Panning can be done with a gloved finger on the screen.

Innovative features include hands-free calling and SOS requests from anywhere to InReach® satellites (requires purchase of InReach unit). Four levels of Adventurous Routing algorithms replace the previous Curvy Roads selection, and of course the XT includes maps with lifetime updates, which happen automatically over WiFi. Garmin also includes a topographic map and free access to BirdsEye images (think Google Earth) that can be downloaded as an overlay on a map with or without a current route running. Switchable map overlay choices can be easily accessed on the fly.
A track recorder app is more intuitive and easy to access than on previous units. Selectable settings enable riders to be forewarned before speed limit drops, school zones, upcoming sharper curves and other special hazards. Alerts can be displayed both onscreen and audibly. A fuel minder app, once set for the specifics of your vehicle, will not only remind you when you reach a low fuel threshold, but will automatically ask you if you want to reset the fuel counter when it detects you have stopped at a gas station. After several hours of continual riding, the XT will automatically offer up a ‘Need A Break?’ screen showing the closest food, fuel and rest stops, with one finger-tap needed to reroute for tank or tummy.

An internal battery is good for a claimed 3-6 hours, and a specific RAM-based 12-volt powered motorcycle mount is included; my bumpy off-pavement experiences have so far revealed no weaknesses in the mounting system. As a Garmin product, map, waypoint and route management is handled both internally and with BaseCamp. Described as rain-resistant, my XT has survived a number of Florida summer deluges without issues.
Free current weather conditions, forecasts, driving conditions and radar, as well as current traffic information, including access to actual traffic cameras are powered to the XT through the Garmin Drive smartphone app. The music player is straightforward and enables access to your smartphone’s music library or MP3 files stored on the XT. The user can add a microSD card up to 256 GB (the manual says 64 GB, but this appears to be an error), can be added to store data, music, maps, tracks and more.

The phone app is also simple and effective; I use a Cardo PackTalk Bold helmet communicator, and the ability to see an incoming caller’s ID, as well as hear it and answer with a finger-tap is easy. Phone conversations, once a user gets all the settings in the unit to ones’ liking, are clear and sufficiently loud for most conditions. Tracks and routes can be managed with the Garmin Explore app.
Incident Detection is another new feature. In the event the XT detects an incident (crash, drop, violent movement followed by inactivity), the InReach function can summon help worldwide. A alert text can also be sent to parties selected by the rider. The XT will display text messages and alerts from the user’s smartphone and even read to the user audibly. A clever Round Trip app makes it easier to find engaging loops with a selected degree of Adventure.

The XT enhances the process of finding interesting riding destinations with purpose with resources such as Foursquare and Trip Advisor. Other Where To resources include Ultimate Public Campgrounds, National Parks, Motorcycle Locations (retailers and repair), History Channel destinations (museums, parks, etc.), nearby fuel and prices and other normal criteria (food, fuel, lodging, etc.). Finding a destination and reason to ride has never been easier; choosing how you wish to shape the route is icing on the cake.
Route Shaping is another innovative feature of the XT, an improvement over the practice of adding a Via Point to redirect an existing route to travel to specific locations, roads or regions as a part of the route. Now, by simply touching the screen, usually zoomed out to Full Route View, the rider simply touches the map in the general area desired, or by zooming in, a specific location or destination, and the XT automatically recalculates the route to find the roads best suited to your request and current route profile. If you don’t like the result, simply touch somewhere else and you have the option to either add additional touch or to delete the previous touch and try again. Multiple such Shaping Points can be added to shape a route to your liking.

The zūmo XT is an Android-based system and uses a variety of apps in the same way as a smartphone or tablet. Available apps include ones for the Owner’s Manual app, Trip Planner, TracBack, Weather and Traffic, live Traffic Cameras, Red Light and Speed camera, service history and more to give riders access to copious amount of information and functionality. A setting enables a user to tap an icon and take an instant screenshot of the GPS; the images can then be transferred to another device.
With about a month and a thousand miles or so of XT experience, I find this to be the most advanced unit I’ve used. My complaints are minor: Recalculating a route, in order to change the route’s characteristics (Fastest, Shortest, Adventurous levels 1-4) on the fly is impractical and usually requires stopping to manipulate the unit with a number of inputs. Route Shaping on the fly, however, is easy and often has a similar effect.

1: Power button. 2: microSD card slot. 3: USB port with water-resistant cover.
The sheer amount of information and data can lead a rider to become overly-fixated on the unit to the detriment of critical current situational awareness. Many functions can be accomplished on the fly with a single quick glance and finger tap, but the more complex call for the responsible rider to pull over and stop in the shade to address the XT.
Two minor misses: The XT uses Garmin’s ANT technology to communicate through the InReach unit, but does not support ANT Tire Pressure Monitoring systems or Ambient Air Temperature sensors. The temperature displayed emanates from the weather app, and is regional. I would like to know the actual air temperature where I am at the moment. Perhaps future upgrades will address these matters.

With the increasing complexity of electronic devices and farkles, technical issues can arise. A Google search for zūmo XT forums can be very helpful. Some issues include difficulties using Bluetooth and mesh network helmet headsets. My helmet sports a Cardo PackTalk Bold, and it works flawlessly with the XT. Forum users offer a number of technical advice and workarounds.
With such a rich palette of features, it behooves the new zūmo XT owner to hunker down in the easy chair for a few hours to get familiar with the many features, functions, settings, views and apps in the zūmo XT; learning the unit while attempting to manage the risks of riding is not recommended.
Available from a wide variety of retailers for $499, I find the zūmo XT to be a worthy successor my previous unit, a 276Cx. It’s not perfect, but it’s gaining on it.
NOTE: Mac users may find it necessary to learn a specific routine to get the XT to communicate with BaseCamp; not all Garmin reps are familiar with this. Frustrated Mac-heads may write me if you wish.
This post has not been tagged.
Permalink
| Comments (1)
|
|
|
Posted By Roger Wiles #32797,
Friday, August 28, 2020
|
"Courage is not the absence of fear, but rather the assessment that something else is more important than fear."
"Now, I still can’t handle sand to save my life, but I figured [it] out right quick when I suddenly had five large dogs chasing me down the street! Perhaps I should open a sand-based riding school and use that as my training method. Just open a cage and be like 'Good luck! Try not to get eaten!’"
The first quote above opens the first volume (The 49 State Tour), and the following quote is near the end of the second book (South of the Border) of Tiffani Burkett’s two-volume retelling of her epic journey. In between, we share Burkett’s metamorphosis from a self-described shy and awkward young woman into a still somewhat-shy-but confident—and not-as-awkward-as-she-believes woman—who has out of necessity applied philosophy to adventure and became a lady wanderer in the mold of the legendary Elspeth Beard.
Burkett originally hoped to be able to stay on the road for a month. A year and a half later, the odyssey nears the end—for now. The first book includes her visit to Alaska, plus some Canadian coverage. The second book takes Burkett and Hollywood all the way to the northern end of the famed and feared Darien Gap. Burkett’s motorcycling chops were far better formed than she realized, and these hard-won skills stood her in good stead for over 60,000 miles.

Drawn to motorcycles and starting as a rank novice in her early 20s, Burkett unexpectedly found a home and a family, one she never had as a child maturing too fast in difficult circumstances. Growing from our shared humble beginnings as riders, Burkett began challenging herself on public roadways, and quickly saw the error of her ways; she then became a track-day junkie, then track-school adherent, and grew into amateur road-racing, competently campaigning a Ninja 250 in the knee-and-elbow cornering scrum, dodging an errant handlebar or knee, and protecting your own kill-switch from malicious tampering by a competitor.
Covering North and Central America on two wheels calls for an adventure-ready machine, and Burkett found hers in a used 2015 Yamaha FZ07. Not quite the purpose-built adventure motorcycle, so Burkett modified her sport bike to carry her gear, fitted it with 80/20 dual-sport tires and pronounced it a suitable adventure touring ride. For over 60,000 miles, and amazingly only one chain, it served Burkett well.

Readers of Motorcyclist magazine followed Burkett’s adventures through a series of articles. Fear not, reader: The two-volume tale is far more detailed than the well-received magazine pieces. The second volume, South of the Border, took Burkett and Hollywood through Mexico and Central America. Road-racer Hollywood learned mas rapido would not only impress the locals with his equally ill-chosen adventure ride, a Yamaha liter bike, but could also consume chains with impunity.
Guatemala, Belize and Costa Rica. Border crossings, delays and bribes—somewhat normal events for two-wheeled adventure tourists. Then, back through Mexico on a different route, and back to the United States, then what? No home, no jobs, just their motorcycle and road-racing family. Look for more journalism from Tiffani Burkett; she has found her place in life and has the courage and talent to write about these things to entertain us with her experiences and personal growth.

Available for Kindle in a one-price, two-volume download, or in paper from most booksellers. Read an excerpt from Volume 1, Chapter 1 on ESPN.com.
This post has not been tagged.
Permalink
| Comments (0)
|
|
|
Posted By Louise Powers #212117,
Thursday, August 13, 2020
|
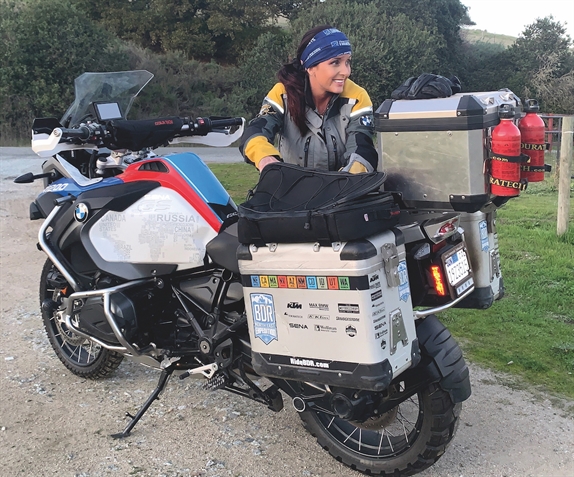
Trailering a motorcycle was not something I ever thought I would do on a regular basis. I have occasionally loaded my GS in the back of a truck to move it across the country with me, or strapped down little dirt bikes to haul to places like Moab and ride. This process has always involved ratchet straps, or a combination of wheel chocks and ratchet straps, and a lot of annoyance on my part. I am a fairly small individual, and wrestling a suddenly unbalanced 600-pound bike is not something I have any interest in doing. My back hurts just thinking about it!
This past spring, I became a full-timer in a toy-hauler and hit the road with my truck, travel trailer, R 1250 GS and a geriatric cat. I jumped at the offer to have my friend Shawn Thomas install a Pit Bull Restraint system in my trailer. I had seen the ease with which bikes were loaded into his trailer using these, and it was a no-brainer for me. I made the trip from my home state of Colorado to California to meet friends for a class at California Superbike school, and at the end of the weekend, we made our way to his house.

Prior to this trip, I attempted to order one of these restraint systems online from Pit Bull’s website, but began to get confused by what pieces and parts I needed to put it together for my bike. I assumed I would be able to go to the website, type in the make and model of my bike, and there would be the kit I needed to purchase. That wasn’t the case - and it makes sense. You might not want to buy all of it together all the time, as you may want extra pieces for hauling bikes in more than one vehicle, or the correct fitments for hauling more than one kind of bike in the same trailer. I asked Shawn to just put together the correct parts I needed, and I’d pay for it. Instead, he called up his local BMW dealer and ordered one; that was the easy way to accomplish the task.
The Pit Bull was there and waiting when I arrived, and I was excited to get it installed. My toy hauler has a sealed underbelly, so removing that was the first part of the task. Next, we rolled the bike inside so I could determine where I wanted it to live, place the plate, and mark the floor for the four required bolts. All that was left was to drill the holes, bolt the plate down with the included hardware, and reseal the trailer. Dealing with the underbelly was the most difficult part, and something most truck or trailer owners will not have to deal with. A few minutes, a couple of easy steps, and I was ready to lock down my bike and roll out. No obnoxious straps necessary.
My No Boundaries toy hauler is made to be towable off-road. It is rugged and has big knobby tires on it, just like my bikes usually do, and I have taken it off-road with the bike in the back. Bouncing around in the back of the toy hauler over rough roads and painful washboard, the GS now stays perfectly still. When I unload the bike at a campsite, all I have left on the floor is a low-profile plate with four bolt heads sticking up. I roll my carpet over the top of it, and once again the party palace is a-swingin’!

Pit Bull Trailer Restraint System, MSRP starting at $309.95. Additional bike-specific pin sets available starting at $89.95; floor mounting plates are $33.95. The system for K and R bikes (2005-19) is $329.95, but is not compatible with K 1600, R 1200 RT or R nineT models with low exhausts.
This post has not been tagged.
Permalink
| Comments (1)
|
|
|
Posted By Marc de Angelis #217644,
Thursday, July 2, 2020
|
If you’re the type of motorcycle owner who prefers to do your own maintenance, chances are that at some point you wished you had a lift. Besides representing a significant investment, typical motorcycle lifts exceed the real estate available in most garages. To address this issue, since the early nineties Kendon LLC has been producing trailers and lifts capable of tilting 90 degrees to minimize footprint. Out of the three lifts in their lineup, I chose the largest, the “Cruiser Lift,” which weighs 185 pounds, has a price tag of $945 and a capacity of 1,000 pounds - more than adequate for my R 1200 RT, the heaviest inhabitant of my garage.
The lift arrived in a neatly packaged crate. The uncrating and assembly required less than an hour. The first item I looked at, once the crate was unpacked, was the owner’s manual. Among other items, the manual provides instructions on how to unpack the crate. I got a chuckle out of the circular logic. The manual I received needed updating as it kept referring to bolts not included in the hardware. Once I realized the bolts had been replaced with pins, the assembly process became straightforward, although a list of hardware would have been a welcome addition.
When fully lowered, the lift rail is still a few inches off the ground, so a detachable ramp is included. Mine was scratched in several places, leaving some unsightly bare metal. While it was nothing that a bit of primer and black spray paint couldn’t fix, I called Kendon to give them the opportunity to stand behind their products. In an age when customer service is typically associated with the words “listen carefully because our menu options have changed,” Kendon earned my praise. Not only was it easy to reach a human, but once I provided a picture of the damage, they sent me a new ramp at no cost.
The lift itself is a scissor design powered by a hydraulic jack. The jack can be operated via either a hand or air pump. To actuate the air pump, Kendon recommends a compressor capable of 150 psi with at least a six-gallon tank. My tiny Rolair, which doesn’t come close to those specifications, can do the job as long as I stop the lifting process frequently to let it catch up. If you aren’t so patient, just crank on the hand pump.

Similar to other scissor designs, the lift includes a bar (referred to as “safety lock”) that automatically engages in a series of mechanical stops as the bike is raised. Once the bike reaches the desired height, the lift no longer relies on hydraulic pressure to maintain its position as long as the safety lock is engaged in one of the stops. The bar needs to be manually released and kept from re-engaging to lower the lift. Kendon provides a handy extension that allows accomplishing this without endangering any body parts. The manual is quite adamant that failure to use the extension will result in a crushed hand, but I wouldn’t have minded a conspicuous sign on the bar itself as a reminder.
When in service, the lift is quite stable as long as the bike’s weight is centered on the rail. The points of contact with the ground are two rubber feet secured to the ends of the inside scissor, and two caster wheels located on the end of the outside scissor. When not in service, the lift can be stood up, thanks to a combination of light weight and the ability to fold the rear section of the rail. Once the lift is tilted upright for storage, the casters allow for a modicum of mobility. The rubber feet provide friction to keep the lift in place while the bike is raised and lowered.
The front chock can be easily repositioned to accommodate the size of the bike’s front wheel. This operation took a little trial and error, but once I got it right, the chock did a good job at holding the bike upright until it was securely tied down. To alleviate the problem of finding convenient anchor points to tie down to the forward end of the bike, I purchased a Canyon Dancer Bar Harness 2 from Revzilla. This device attaches to the grips and ensures the tie-downs are kept well away from any painted surfaces. It worked for me, and at less than $33, it’s well worth it for the peace of mind. There are four tie-down anchor points on the lift, and all four should be used to maximize the bike’s stability while it’s raised or lowered.
The instructions for positioning, lifting, securing and lowering the bike are easy to follow. Even though the Kendon commercials show that it is possible for a single person to operate the lift, the manual recommends using a helper. I wholeheartedly agree. There are several critical points from the time the bike is rolled onto the rail until it’s completely secured, when a second set of hands and eyes can make a difference. Also, the combination of tall windscreen and low ceiling can make for close encounters of the expensive type, so having a spotter while raising the bike can save a lot of grief.

Getting the bike off the lift requires compressing and releasing the front springs to rotate the chock. Timing the squeezing and releasing the front brake lever is one of the keys to accomplish this correctly, and don’t be surprised if it takes more than one try. Again, having an assistant on hand to keep the bike in balance during the transition is very helpful.
While there is a provision to remove parts of the rail to facilitate either front or rear wheel removal, this operation requires supporting the bike by the frame. Unfortunately, the rail is only 10.5 inches wide, which saves weight and space, but precludes the use of a paddock stand, or even a center stand. For $165, Kendon will sell you a center jack that solves the problem. Or, you can use your imagination to solve it on your own. Personally, I found that this drawback is minor and didn’t experience any problems when removing the rear wheel of an Airhead to install new brake shoes.
On the upside, the lift greatly facilitates accessing critical areas of the bike without having to assume painful or undignified positions such as bending, kneeling or tying yourself into a pretzel. Best of all, when the work is done, it tucks nicely into a corner of the garage that would otherwise be dead space.
All in all, I’m quite satisfied with the Kendon Stand-up Cruiser Lift. If you enjoy turning a few wrenches but your garage space is at a premium, you should definitely consider purchasing one for yourself.
About the author: Marc de Angelis was born in Rome, Italy, to U.S. parents and resides in Arlington, VA. He recently retired from the Naval Sea Systems Command, where he worked as a civilian. He is also a 20-year U.S. Navy veteran. He enjoys riding the Grey Ghost, a 1995 R 100 RT, and the Scarlet Swirl, a 2018 Mars Red R 1200 RT.
This post has not been tagged.
Permalink
| Comments (5)
|
|
|
Posted By Frank Florio #129302,
Tuesday, June 16, 2020
|
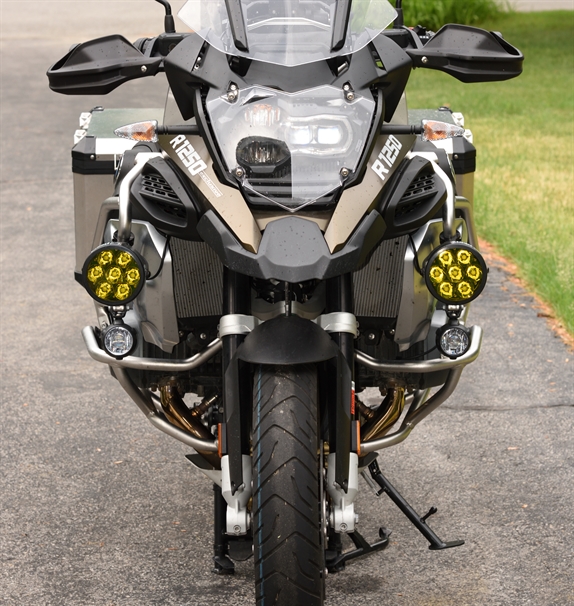
I was in an accident and totaled my brand new 2019 R 1250 GSA on the way back from the rally in Nashville, Tenn., last year. When the property claim was settled and I got my check, I immediately purchased my brand new 2020 R 1250 GSA! Somewhere in the process of planning to buy the new bike I heard Muriel Farrington's voice telling me how the installation of auxiliary lighting up front essentially eliminated for her the hazard of not being seen. I knew I wanted additional lighting, so I decided on the ClearWater Sevina lighting system. When installed, I placed the amber lens on.
My buddy Carlos and I took a night ride in northeast New Jersey a few weeks ago and were amazed how far in front of us these lights provide visibility! We played a bit with the positioning of the left and right side to maximize visibility. When I rode behind Carlos, I stayed a good 3 to 4 seconds back and he claims these lights significantly improved his visibility also.
Muriel has the Darla lights with yellow (she calls them lime green). Here's what she told me: "It is amazing that many vehicles don't even pull out, even when they have plenty of time; others start to pull out and stop. The only times anyone did pull out (twice), I had just made a left hand turn onto the street the cars were in the process of pulling into the traffic lane. I can see why they would not have seen an oncoming vehicle. Funny story: I was on an interstate and a car pulled into my lane. It wasn't a dangerous move, but given the lack of traffic, it was impolite. I cranked up the intensity on the lights while in back of him. He exited the interstate, and at that point I saw he was a Statie! He went on his way." I love the lights so much I had my dealer put a set on my other bike.
I was riding in New Holland, Pennsylvania, on Main Street heading east. Traffic was heavy and a car turned left from the west direction to enter the McDonalds I was practically passing. Zero way to avoid the impact. The ABS brakes got me down to probably 10-15 MPH from about 20-25. The bike hit the rear of her front fender (passenger side) just before that space between the fender and front passenger door.
Upon impact I flew off, landed on her windshield, slid off her hood and landed on the street. By the time I stood up to take inventory of myself, the driver who hit me approached me and she was a complete disaster, just wrecked emotionally. She apologized and repeated a few times she just didn't see me. I put my arm around her shoulders and told her I was OK for the most part, this was only an accident and we will get through this.
As I was calming her down I noticed kids in her car, so I asked her if they were OK. She said they are OK but scared. I suggested we talk to them; I hobbled over to the car and assured them I'm OK, minor injury but will heal and please understand this was an accident, unfortunate but that's all it is. I told them I'm not mad at them, I'm not mad at their mom, and I'm not mad at their car and then asked them not to worry about seeing me take off in an ambulance. I told them I promised my wife if this ever happened I would take the ambulance to the hospital even if I felt either I didn't need to or didn't want to.
As the mom and I walked away from calming her children she said, "I can't believe how composed and wonderful your being under the circumstance, you're being so kind." I turned to her and responded with, "would you like to return this kindness?" She said, "Absolutely, what can I do?" I told her to be honest with the responding officer and her insurance company because this is 100% her fault and I don't want to have to chase the truth once I leave the scene in the arriving ambulance. She did just that!

Once I was lying on the gurney, the EMS folks wouldn't let me off when I announced I needed to get my stuff off the bike. They were like, don't worry about that now, when you're released you can catch up with your stuff then. I said no way, I live over 300 miles away, and by the time the hospital releases me, the tow yard will be closed and this just wont work for me, so I'm getting up. EMS said once you're on the gurney we can't let you up.
Another EMT came along just as I was talking about this issue and she said not to worry; since I was so nice to the driver and her children she would go back to the bike to gather all my stuff for me! EMS took me to Lancaster Trauma Center. The first thing the trauma doc said was "Take great care of Frank, this is the guy who took care of the mom and her children as his first priority at the accident scene."
I fractured my pelvis (right rami pubis bone fracture). The hospital said if I was ambulatory within a few hours they would release me, so after a few hours my buddy Carlos met me there and drove me to his place in New Jersey. You had to see me walking out of the hospital with two wheelchairs, both with my stuff from the bike and me hobbling and pushing one and an orderly pushing the other. My friend couldn't believe his eyes! I spoke with responding police officer the next day and the dispatcher who answered my call recognized my name and said, "Hey, you're the accident who was so nice to the driver and her kids, you're solid in our book. What can we do?" She put me through immediately to the responding officer who was out in the field and not supposed to take such a call, but since he knew how I handled the accident scene he took my call and told me the official report will be clear she's 100% at fault and she will get a citation. Her insurance company took 100% liability and sent me the check, so I'm whole on the bike.
It sure paid me big time to maintain my composure and show empathy toward the at fault driver in this accident. Each responding resource (Police, EMS, Hospital) took extra care of me as a result since the news spread so quickly about my disposition during all this accident chaos. And the coolest thing? A brand new bike with ClearWater Sevinas!
Clearwater Sevina LED lights, MSRP US$1,049-1,114.
This post has not been tagged.
Permalink
| Comments (6)
|
|
|
Posted By Jocelin Snow #210823,
Thursday, May 28, 2020
|
What will today's adventure be?
From one day to the next, I am never exactly sure where my motorcycle adventures will take me. Somedays, I am deep in the mountains with my R 1250 GS Adventure exploring a new country, and others I am riding my R 1200 GS Rallye on my obstacle course in my back yard. Just in the last few months I have had numerous thrilling adventures. Riding along with the GS Trophy in New Zealand on BMW’s F 850 GS was certainly one of the highlights.
Wherever in the world I am riding and whichever bike it may be, one thing is for sure, you will not catch me without my MotoPOCKETS, guaranteed.
Although I find all of the MotoPOCKET Adventure pockets useful, I do have my favorites. When it comes to my handlebar bag, I'm like a child with a blankie, as that bag goes with me on every ride. The easy-on, easy-off Velcro straps that attach the bag to my handlebars are slick compared to other brand bar bags which made me feel like I was trying to put socks on a rooster.
I tend to be one of those people who has to put things away where they belong. If I don't, I may end up looking for it for hours, or maybe days. My water-resistant MotoPOCKETS handlebar bag ($61.95) allows me to safely store my phone, keys, Chapstick, gas card and other random items that I’ll need to find easily and when I need them. The double zipper is easy to use when I'm frantically reaching for something while at a stop, and the fabric topped lip helps keep items intact when I am moving even without having fully closed the zipper.

Rumor has it that I am short, but even so, the handlebar bag does not restrict my view of the GPS or dash. Like me, you may realize a MotoPOCKETS handlebar bag to be one of those accessories you didn't know you needed, but once you have one, you just can't ride without it.
The MotoPOCKETS expandable pannier bags ($149.95) are another of my favorite pieces of gear. When I first saw them I remember thinking, "Why would anyone need more storage than the aluminum pannier boxes?" Then I strapped a bag on top of each of my panniers and headed out on a ten-day ride and soon realized these bags are not only handy but necessary.
Inside my panniers I have the zipped liners which are convenient when I am carrying my belongings into a hotel or to the campsite but they can be a bit of a hassle if I need to access an item quickly. The MotoPOCKETS pannier bags simply attach with Velcro on top of the panniers and provide a quick and easy way to grab-n-go.
"What do I carry in the bags" you ask?
Well, in the left bag I store my first aid kit, spare gloves and a light tool bag. The right bag stores my Handpresso portable espresso machine and snacks. With all of that, I still have plenty of room for treasures I may find along my adventures and have peace of mind the padding in the bags will help them travel safely to wherever I end up next.
MotoPOCKETS offers storage solutions for almost any motorcycle. In addition to the handlebar and pannier bags I use, they also sell windshield bags, tank bags and phone cases. All of their products are made in the U.S. using premium materials. For more information or to purchase, visit adventurepockets.com.
This post has not been tagged.
Permalink
| Comments (0)
|
|
|
Posted By Mark Thompson #218859,
Monday, May 11, 2020
|
Fieldsheer’s Mobile Warming Riding Gear makes riding gear much more useful because you can have comforting warmth both on and off the bike. As we all know (or learn), heated riding gear extends our riding season and saves the day when the weather-guessers tell us “sunny and dry” and it becomes something much different.
To use its full name, the Fieldsheer Hydro Textile Heated jacket—let’s call it the “Hydro” - is a top-of-the-line, waterproof, all-purpose adventure/touring jacket. You can either plug it into the bike's electrical system or when you're off the bike, use an optional lithium battery (another $70) to keep you warm.
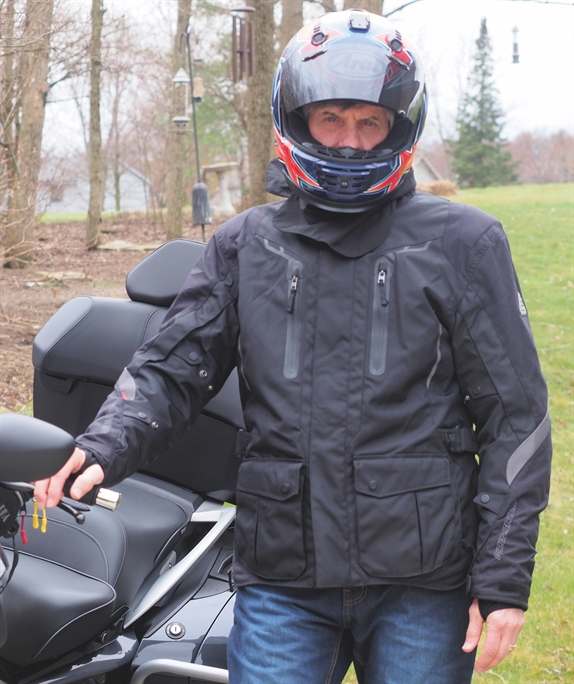
I needed just such a jacket for the wet and cold autumn months in Ohio. While not inexpensive - retail is $449 - Fieldsheer had it on sale on their website, saving me a bundle. This is a jacket that does the job of keeping you warm and dry under extreme weather conditions, whether on or off the bike.
I added the optional 12-volt lithium battery for off-bike use, which makes the inner, softshell jacket ideal for cooler weather spectating, errands or hanging out late on the patio at the local pub. The compact 5200mAh 12-volt battery is a little larger than a pack of playing cards and doubles as a backup cell phone power source. Its built-in LED light helped me find the keys I’d dropped in a parking lot one very dark night.

The Hydro is a two-part jacket, with the outer jacket constructed from Fieldsheer’s own Carbolex HD™ ballistic nylon, while the removable inner softshell jacket holds the heating elements and temperature control. The inner jacket looks like a typical lightweight jacket and is easily detached and worn as such. The lithium battery slips into a small zippered pocket that comes prewired with all connections; just plug in the lithium battery and hit the ON switch. Another inner pocket holds the prewired cable connections for directly hooking into the bike’s electrical system. With everything prewired and installed, there’s nothing more for you to do other than plug-in, power up, and go, a nice touch.
On the inner jacket's right chest, you'll find a small, round rubber logo—your power switch. One three-second push (easy even with gloved hands) and a red LED tells you power is on and at 100 percent. Another button push changes it to yellow (75 percent power), then green (50 percent), and blue (25 percent). The final button push brings it back to 100 percent power. On battery power alone, you can expect real-world times of about two hours of heat on a full charge, or three hours at 75 percent power, five hours at 50 percent, and perhaps 10 hours at the lowest setting. Green LEDs report on the battery’s charge level, and I saw about four hours for a complete battery recharge via electrical outlet and 90 minutes longer via USB.

Switch to running on the bike’s electrical system and clicking through the button choices gets you the same results. At the full-power setting, the temperature is at 149 degrees, dropping to 132, 118 and finally down to 100 degrees F.
Fieldsheer’s Mobile Warming gear uses pigtail (barrel style, male/female) connectors, not the more common SAE style. If you're going to add other heated garments like gloves, pants or socks, you may want to stay within the Fieldsheer brand. An illustrated manual shows how to hook up multiple garments to the bike’s electrics. The lithium battery, however, will only power one thing at a time. Some items such as the gloves offer the option of a separate lithium battery for power. Mix and match to suit your needs.
What great heat! Both your chest and back are swathed in wide zones of soothing warmth. Your upper back, arms and shoulders especially appreciate how the jacket keeps muscles warm and relaxed even after several hours in the saddle. The heating panels are large but not intrusive. When you’re off the bike and relying on the lithium battery, you get only upper back and chest heat.
One nit worth mentioning: Temperature adjustments mean unzipping the outer jacket because the power switch is tucked away on the softshell inner jacket’s chest. It can be a minor inconvenience or require a stop. More and more of Fieldsheer’s riding gear now offer a Bluetooth option, where you can control the temperature via your phone. Perhaps this will be in the Hydro's next generation.
Regarding fit, in size large it felt like Fieldsheer designed the Hydro specifically for me (they didn’t), but at six-nothing and 170 lbs., I’m a slim dude that usually goes for “athletic fit” clothing. This is a jacket you should try on first to see if it matches your physique. The inner jacket has drawstrings at the waist for sizing tweaks, and the outer jacket has hook and loop at the cuffs, double pairs of snaps on the sleeves, and more hook and loop on the waist for perfecting your fit. Level 1 CE armor hides in removable pockets in the back and shoulders. Zippered vents on the chest and back are there to provide a breeze on warm days. It’s all backed by a one-year warranty.
Phoslite® reflective panels in multiple spots on the jacket aide nighttime visibility. Carbolex-HD® fabric ballistic nylon fabric developed by Fieldsheer provides a high level of abrasion resistance. The Carbolex HD® is also waterproof, hence the “Hydro” in the jacket’s name, while a breathable internal membrane keeps you from getting clammy. All seams are thermo-sealed, and there are multiple large, convenient pockets both inside and out, most closing with zippers or hook and loop for secure storage. I could easily open the external pockets while wearing gloves. An adjustable neck bandana is built into the collar to help keep the breeze out—I flat out love this feature!
This is a substantial jacket with a weight of about seven pounds with the optional 11-ounce battery tucked into its pocket. This weight, however, is comparable to many other top-of-the-line riding jackets that don’t offer the versatility of dual power sources.
All this goodness comes at a price, of course. The suggested retail is $449, but I got mine for $337 at an end-of-season sale. You can order the Hydro and all Fieldsheer’s riding and work gear directly from the company. Their website includes a size chart. Go to mobilewarming.com for more information or to order.
Tags:
gear
jacket
winter
Permalink
| Comments (0)
|
|
|
Posted By Bill Stermer #32290,
Tuesday, January 7, 2020
|
Arai has always been known as a manufacturer of premium helmets, and with the elevated price range of the Quantum-X, you know you’re definitely paying a premium price here. As a motorcycle journalist, I have tested many dozens of helmets over my 40-year career and can attest that, in my experience, Arai helmets have always been impressive for their fit, finish, comfort, graphics and overall satisfaction.
One unique factor in Arai’s comfort level is that the company offers several interior fit configurations to address the range of human head shapes. The Quantum-X tested here features Arai’s Round Oval interior fit shape, which means it is shorter front-to-back and wider to the sides. For other models and their shape options, consult the Arai website (araiamericas.com). Because of these fine distinctions among its various models, Arai recommends that, when it’s time to buy, visit a dealer and try on their various helmet models to determine your ideal fit.
Arai describes the Quantum-X as being made from a “peripherally belted, super-complex laminate construction shell design” that combines multiple materials and techniques created by Arai. It is basically fiberglass, but more than 20 individual materials are used in constructing the shell. This layering factor is useful in that it can often help in dispersing impact energy, and the helmet is thus certified to meet not only the DOT standard (required for all street helmets sold in the U.S.), but also the more demanding Snell standard.

The interior is deluxe, made of an anti-microbial synthetic material that allows the helmet to slide on easily and, when properly fitted, hug the head. Sealing the lower portion of the helmet is a waterproof chin guard that smooths the airflow and prevents wind or water from coming up.
Venting is quite functional thanks to a pair of controllable intake vents along the top, helped by a pair of adjustable exhaust vents in the rear. Fine tune the adjustable openings with their sliding controls and you’re sure to find a comfortable setting. The two-position chin bar vent is also quite functional, and in addition, there’s a pair of brow vents in the shield.
The only criticism I can offer regarding the Quantum-X is that its shield-changing mechanism is not intuitive. If you’re changing from your tinted to your clear shield at sunset, this factor can become crucial. To change the shield on this helmet, first raise it, push a lever to release each side cover, then pull off the cover to expose the shield pivot mechanism. At this point the shield simply pivots in its grooves; there is no clear indication as to how it releases. However, pushing the release lever further pops the shield outward so that the round, brass button on that side can then slide over and fit into a corresponding red circle on the shield mechanism. This allows it to be positioned so that it can be pulled out and popped off. And speaking of lenses, the Quantum-X is also packaged with a Max Vision, fog-resistant Pinlock lens that comes ready to install.
Reinstalling the shield is literally a snap. Position the brass button over the red dot on each side, raise the shield, and the two sides literally slide and snap into their proper tracks, so you’re good to go.
While riding I found the Quantum-X to be comfortable and very quiet. It fits and seals very well around the head, moves through the wind blast with minimal resistance, and its protrusions are so well integrated as to not create much wind noise. The graphics are first-rate and, overall, I find it a superior helmet.
Pearl Black costs $679.95, White $699.95, Black Frost, Aluminum Silver, Diamond Black, Diamond White $709.95, Fluorescent Yellow and all graphics $829.95, and all are available in sizes from XS – XXL. Find out more on Arai's website.
This post has not been tagged.
Permalink
| Comments (0)
|
|
|
Posted By Douglas Olin #183966,
Tuesday, December 31, 2019
|
There I was in Baja, on a heavily loaded R 1200 GS Adventure with well-worn street tires, suddenly facing 20 kilometers of dirt, sand and gravel as the highway turned from solid pavement into a zona en construcción.
It probably would have been just fine, but about halfway through, the “two lanes” of traffic devolved into a Mad Max free-for-all with an oncoming 18-wheeler being passed by an SUV while another SUV was trying to pass me along with a quartet of dirt bikes at high speed somewhere in the middle. Forced out of my line and pushed to the outside edge of what now had become five “lanes” of traffic, I hit a patch of deep sand and went down. Hard. I don’t remember being thrown from the bike. What I do remember was lying on my back, in absolutely no discomfort while feeling a bit like the Michelin Man.
Then it struck me. I was wearing my Helite jacket!

Founded 17 years ago by Gérard Thevenot, a French pioneer in the light aircraft industry, Helite offers inflatable protective and wearable airbag systems for motorcyclists, horse-riders, skiers and pilots.
I was aware of Helite’s line of motorcycle airbag vests, having seen their booths at various motorcycle shows over the years. Despite being an ATGATT rider, I doubted the product and saw the vest as yet one more piece of gear to layer on top of an already heavily armored jacket.
However, when a fellow rider from southern California survived what should have been a fatal rear end collision on I-405 in Los Angeles (a highway I drive with some frequency) and credited his survival to the Helite vest he was wearing, I began to look into it more seriously. Over time, I discovered that Helite has quite a fan club, made up of a significant number of people who have survived collisions, crashes and deer strikes in large part due to Helite airbags.
About three years ago, I bought what was then known as the Helite Adventure Jacket V.1.0. The Helite Adventure Jacket reviewed here has been superseded by the Helite Touring Jacket, which is similar in design and features, but offers slightly larger vents, a different pocket configuration and slightly different color patterns. Both the older and the newer versions may be available through Helite.

I went with the jacket over the airbag vest for two reasons. First, I knew that I would never ride without a jacket, whereas I would consider a vest and too easily forgotten or ignored. Second, I liked the way it looked.
Helite airbags are designed to rapidly inflate if the rider is thrown from the bike. When inflated, the airbag holds the torso and neck in place, providing whiplash and spinal protection while simultaneously shielding the body from impact.
The system is totally mechanical. The jacket has a quick release connection to an elastic lanyard, which is attached to the bike. The airbag activates if enough force is exerted to trigger a CO2 cartridge in the chest pocket; upon release, the cartridge inflates the airbag in less than 0.1 second. It takes about 60 pounds of force to activate the system, which means you won’t set it off by accident, even if you are getting off the bike while still clipped in.
It takes a bit of time to get used to clipping yourself into the lanyard whenever you ride, but after a while it becomes second nature. Helite offers long and short lanyards, depending on your needs. I’ve talked to many riders who, like myself, detach the lanyard when deliberately heading off-road in order to avoid deploying the airbag on slow speed get-offs in sand, dirt and gravel and then reattach when heading back to pavement.
One advantage of the Helite design is that the airbag is made for repeat use. Once the airbag is deployed, it slowly deflates over a few minutes. It takes mere minutes to reset the system and replace the CO2 cartridge. The cartridges may be a bit difficult to source, particularly when abroad. As I learned in Mexico, you will want to carry a spare cartridge when traveling.
From the outside, the Helite Adventure Jacket looks similar to any number of modern, textile motorcycle jackets. Broad in the shoulders, narrow in the hips, the jacket comes in black or grey. The jacket is cut at three-quarter length, which makes it a bit longer than many motorcycle jackets. I think this looks better when off the bike, but the bottom of the jacket can bunch up when riding.
The airbag itself is built into the jacket, under the SAS-TEC CE Level 2 back protector, and is not visible even when deployed. There is CE Level 1 armor for the elbows and shoulders as well as retro-reflective panels on the front, back and arms for increased visibility at night.
The outer shell of the jacket is Cordura 600D, with Cordura 1000D reinforcing the elbows and shoulders. This makes the jacket waterproof, windproof and breathable. It comes with a removable polyester thermal liner and an adjustable slider for the neck. There are a variety of pockets on the interior and exterior of the jacket, as well as two-way waterproof zippers on the sleeve cuffs for ventilation and waterproof zippered side vents as well.

My jacket has two large chest pockets, one of which includes the mount for the CO2 cartridge, as well as six pockets (two large and four small) at the waist and ribcage, and two very small pockets on the shoulders. There is also large pocket across the rear of the jacket, a hidden zippered pocket in the chest, and an interior pocket. The newer version of the jacket has fewer pockets, but they are somewhat larger.
I ride with the jacket in all weather, wearing a Hypercool cooling vest in extreme temperatures (i.e., over 100 degrees F). I have found that well-ventilated jackets can generate a “convection oven effect” on my torso when temperatures get too high, so I tend to avoid them. In cold weather I don’t bother with the included Polyester liner, I use an electric jacket or vest underneath. The Helite jacket has somewhat less ventilation than many other textile jackets, since there’s no place for chest vents. This may see some riders to consider this a three-season jacket.
Helite has been offering an growing line of jackets and vests. My Adventure Jacket continues to serve me well after more than 50,000 miles of travel in all sorts of conditions. For safety and comfort, it has become my go-to jacket.
If you’re ever lying on the ground in Mexico wondering what just happened, you might just be really glad you were wearing one.
Pros
- Airbags offer substantial additional protection in a crash.
- No special tools or technical knowledge required to install or operate. No electronic sensors or batteries to change. It’s simple and elegant.
- Even without the airbag, it is a first-rate motorcycle jacket with many of the features and protective qualities offered by today’s top manufacturers.
- Excellent value proposition, particularly if purchased at a show or rally; Helite frequently offers discounts and deals at shows.
Cons
- Additional CO2 cartridges can be difficult to source while on the road. Carry a spare.
- The jackets tend to run small. Buy a size or two larger than you normally wear.
- Check with the airline before traveling with a CO2 cartridge.
- After three years of use, there is some fraying on the jacket where the clip rubs against it.
This post has not been tagged.
Permalink
| Comments (0)
|
|
